EARTH SCIENCE FIELD LAB · MINERAL IDENTIFICATION
Reading the Hidden Clues Inside Minerals
Learn how geologists use four essential physical properties to distinguish minerals and recognize common specimens.
Imagine finding an unusual mineral specimen during a hike. It has a shiny surface, a pale color, and several flat faces. At first glance, it might resemble quartz, calcite, or another common mineral.
How can you determine what it actually is?
Geologists rarely identify minerals by color alone. Instead, they examine physical properties that reflect a mineral’s internal structure and chemical composition.
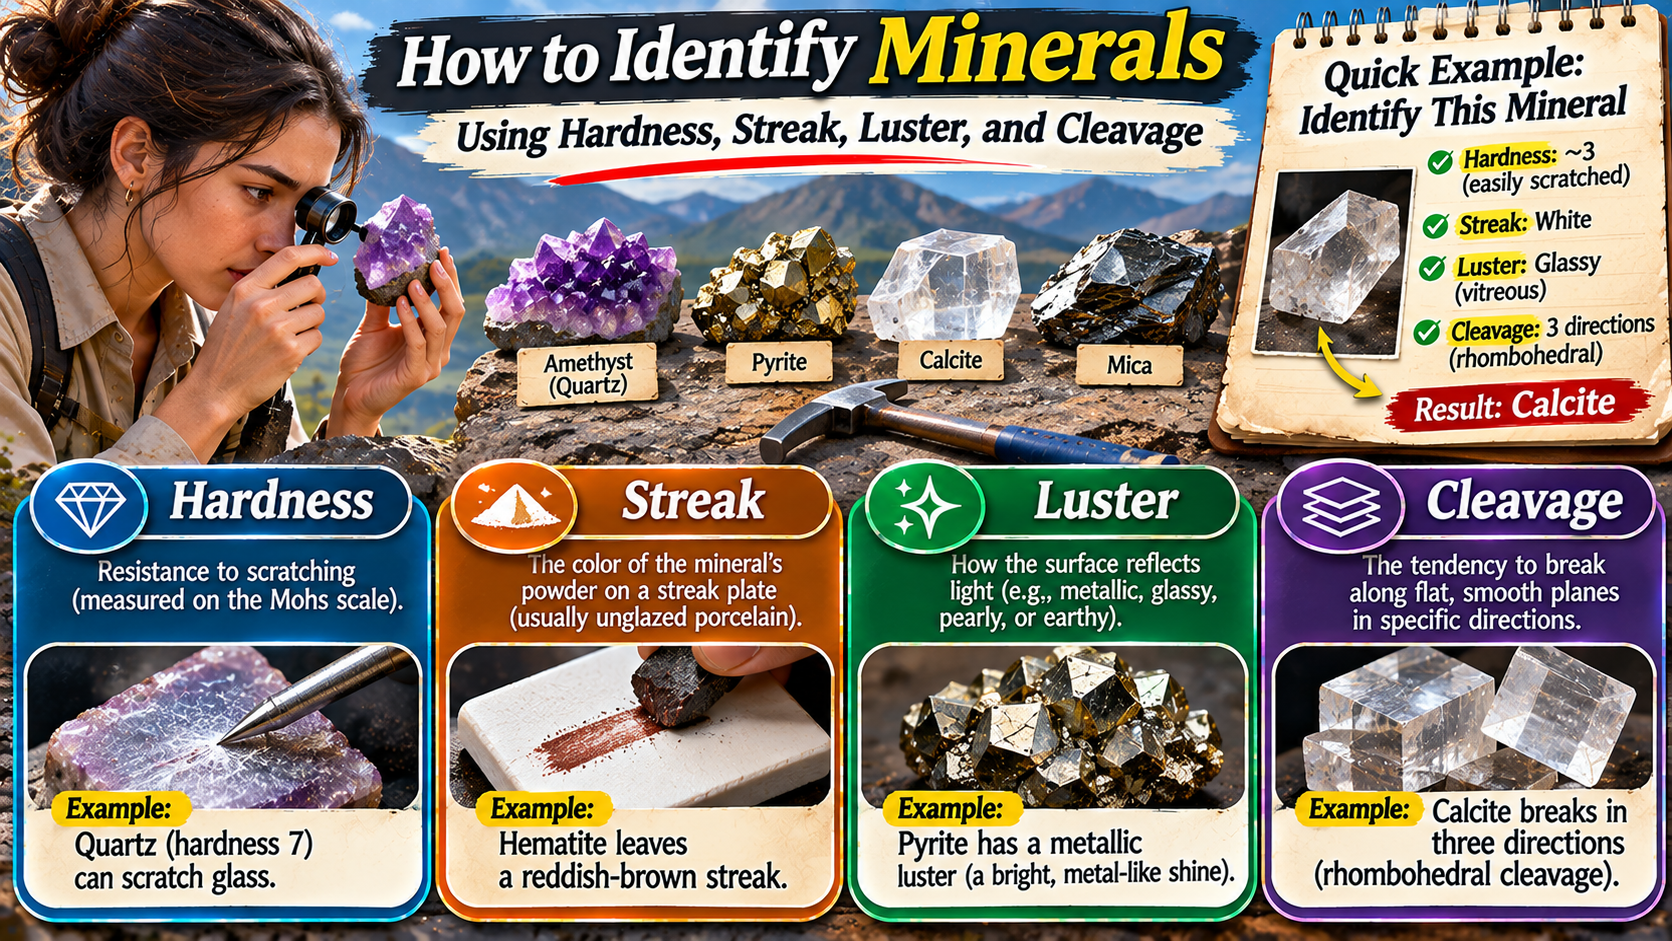
Four of the most useful properties are hardness, streak, luster, and cleavage.
Each property provides a different clue. Hardness describes resistance to scratching. Streak reveals the color of a mineral’s powder. Luster describes how its surface reflects light. Cleavage shows how the mineral tends to break along planes of weakness.
By combining these observations, beginners can narrow down possible identities and learn to distinguish minerals that look similar.
Why Mineral Identification Requires Multiple Tests
Minerals are naturally occurring crystalline solids with characteristic chemical compositions and ordered internal structures.
Their physical properties arise from the arrangement of atoms and the types of chemical bonds within the crystal.
Some minerals have distinctive colors, but many appear in several different shades.
Quartz, for example, may be clear, white, purple, pink, or smoky gray.
Color variations can result from impurities, structural defects, or other geological processes.
Therefore, a mineral’s appearance may not provide enough information for reliable identification.
Geologists use combinations of observable properties to reduce uncertainty.
A mineral that resembles another specimen in color may behave very differently during a scratch test or show a different pattern of cleavage.
The most dependable beginner identification process compares several properties rather than relying on a single feature.
1. Hardness: How Easily Can a Mineral Be Scratched?
Hardness describes a mineral’s resistance to scratching.
One of the most widely used systems for comparing mineral hardness is the Mohs hardness scale.
Developed by German mineralogist Friedrich Mohs in 1812, the scale ranks ten reference minerals from 1 to 10.
Talc is the softest reference mineral, with a hardness of 1.
Diamond is the hardest reference mineral, with a hardness of 10.
The scale is relative rather than linear. The difference in actual hardness between two adjacent numbers is not necessarily equal.
For practical identification, the important question is whether one material can scratch another.
The Mohs Hardness Scale
| Mohs Hardness | Reference Mineral | Identification Note |
|---|---|---|
| 1 | Talc | Very soft; easily scratched |
| 2 | Gypsum | Can be scratched with a fingernail |
| 3 | Calcite | Softer than copper and steel |
| 4 | Fluorite | Intermediate hardness |
| 5 | Apatite | Near the hardness of some steels |
| 6 | Orthoclase feldspar | Can scratch ordinary glass |
| 7 | Quartz | Harder than common glass |
| 8 | Topaz | Very resistant to scratching |
| 9 | Corundum | Extremely hard mineral |
| 10 | Diamond | Hardest Mohs reference mineral |
How to Perform a Basic Hardness Test
Begin with a clean, inconspicuous surface on the specimen.
Choose a reference material with approximately known hardness.
A fingernail has a hardness of roughly 2.5, while a common copper coin is often used as an approximate reference near 3, although its actual hardness depends on its composition.
A steel nail or similar object can provide another comparison, but its hardness varies with the type of steel.
Gently attempt to scratch the mineral with the reference material.
Look for a genuine groove rather than a removable mark left by the testing object.
If the reference material scratches the specimen, the specimen is softer than the reference.
If the specimen scratches the reference material, it is harder.
Repeat the comparison with another reference to narrow down the hardness range.
FIELD LAB TIP / HARDNESS TESTING
Do not confuse a powder mark with a scratch. Wipe the surface gently after testing. A true scratch leaves a physical groove, while transferred material may rub away.
2. Streak: The Color of a Mineral’s Powder
Streak is the color of a mineral in powdered form.
It is commonly tested by rubbing a mineral against an unglazed porcelain streak plate.
For many minerals, streak is more consistent than the color of the intact specimen.
This makes it particularly useful for identifying minerals with metallic appearances.
For example, hematite may appear dark gray, black, reddish, or metallic.
However, it commonly produces a reddish-brown streak.
Pyrite, often called fool’s gold, has a brassy-yellow appearance but typically produces a greenish-black to brownish-black streak.
These differences can help distinguish minerals that appear similar at first glance.
How to Perform a Streak Test
Use a clean, unglazed porcelain streak plate.
Choose a small area of the mineral and gently rub it across the plate.
Observe the color of the powder left behind.
If no visible powder appears, the mineral may be harder than the streak plate.
Most common streak plates have a hardness of approximately 6.5 to 7.
Hard minerals such as quartz may scratch the plate rather than leave a useful streak.
In such cases, other identification properties become more important.
3. Luster: How a Mineral Reflects Light
Luster describes the way light reflects from a mineral’s surface.
It is one of the first properties geologists examine because it can often be observed without damaging the specimen.
Mineral luster is broadly divided into metallic and nonmetallic categories.
Metallic minerals reflect light in a way that resembles polished metal.
Nonmetallic minerals may appear glassy, pearly, silky, resinous, or dull.
Luster depends on the interaction between light and the mineral’s surface.
A fresh, clean surface usually provides a more useful observation than one covered with dirt or weathering products.
MINERAL SURFACE REFERENCE / LUSTER TYPES
Reflects light like metal. Example: pyrite.
Glass-like appearance. Example: quartz.
Soft, pearl-like reflection. Example: some mica cleavage surfaces.
Fibrous, silk-like reflection. Example: some fibrous gypsum.
Resembles resin. Example: some sphalerite specimens.
Little obvious reflection. Example: some weathered mineral surfaces.
4. Cleavage: How Minerals Break Along Flat Surfaces
Cleavage describes a mineral’s tendency to break along specific planes of weakness within its crystal structure.
These planes are related to the arrangement of atoms and the strength of chemical bonds.
When a mineral breaks along cleavage planes, it may produce relatively smooth, flat surfaces.
The number of cleavage directions and the angles between them can provide important identification clues.
Some minerals have one prominent cleavage direction.
Others have two, three, or more directions.
Some minerals do not show useful cleavage and instead break irregularly.
Common Cleavage Patterns
One direction: Mica commonly splits into thin sheets because of excellent basal cleavage.
Two directions: Many feldspars display two cleavage directions that intersect at approximately right angles.
Three directions: Calcite has three cleavage directions that form rhombohedral shapes rather than cubes.
Cubic cleavage: Halite has three cleavage directions meeting at approximately 90 degrees.
These patterns help distinguish minerals that might otherwise appear similar.
Cleavage vs. Fracture: An Important Difference
Cleavage and fracture describe different ways minerals break.
Cleavage occurs along structurally preferred planes.
Fracture describes breakage that does not follow distinct cleavage planes.
Quartz is a familiar example of a mineral that lacks cleavage and commonly displays conchoidal fracture.
Conchoidal fracture produces curved, shell-like broken surfaces.
Glass can also show similar fracture patterns.
Recognizing the difference between cleavage and fracture prevents common identification mistakes.
CRYSTAL STRUCTURE / BREAKAGE COMPARISON
CLEAVAGE: Breaks along preferred planes, often producing flat surfaces.
FRACTURE: Breaks without following consistent cleavage planes, producing irregular or curved surfaces.
A Practical Mineral Identification Workflow
Identifying an unknown mineral becomes easier when observations follow a consistent order.
Start with non-destructive tests before attempting methods that could damage the specimen.
Record each observation in a notebook or identification worksheet.
Then compare the combined results with a reliable mineral reference guide.
FIELD LAB / IDENTIFICATION SEQUENCE
Observe color, transparency, crystal shape, and luster.
Use suitable reference materials to establish a hardness range.
Observe the powder color if the mineral is soft enough for a streak plate.
Examine existing broken surfaces for flat planes or irregular patterns.
Use the combined observations to narrow down possible mineral identities.
Identifying Common Minerals: Examples
Comparing familiar minerals demonstrates why several tests are more useful than appearance alone.
Quartz
Quartz commonly has a hardness of 7 and a vitreous luster.
It typically produces a white streak when powdered, although its hardness makes a conventional streak test difficult.
Quartz lacks cleavage and commonly displays conchoidal fracture.
These properties help distinguish it from softer, cleavage-bearing minerals.
Calcite
Calcite has a Mohs hardness of 3.
It commonly has a vitreous luster and white streak.
Its distinctive rhombohedral cleavage provides an important identification clue.
Calcite also reacts with dilute hydrochloric acid, producing visible bubbles under suitable conditions.
Acid testing should only be performed with appropriate training and safety precautions.
Pyrite
Pyrite has a metallic luster and a brassy-yellow color.
Its hardness is approximately 6 to 6.5.
It commonly produces a greenish-black to brownish-black streak.
These properties help distinguish pyrite from native gold, which is softer and has a yellow streak.
Gypsum
Gypsum has a Mohs hardness of 2.
It can usually be scratched with a fingernail.
Depending on its form, gypsum may display vitreous, pearly, or silky luster.
Its softness makes it relatively easy to recognize among common minerals.
Common Mineral Properties Compared
| Mineral | Hardness | Streak | Typical Luster | Cleavage / Fracture |
|---|---|---|---|---|
| Quartz | 7 | White | Vitreous | No cleavage; conchoidal fracture |
| Calcite | 3 | White | Vitreous | Three rhombohedral directions |
| Pyrite | 6–6.5 | Greenish-black to brownish-black | Metallic | Poor or indistinct cleavage |
| Gypsum | 2 | White | Vitreous, pearly, or silky | One perfect cleavage direction |
| Halite | 2–2.5 | White | Vitreous | Three cubic directions |
Common Mistakes Beginners Should Avoid
One common mistake is identifying a mineral entirely by color.
Different minerals can share similar colors, while one mineral may occur in several shades.
Another mistake is assuming that every shiny mineral is metallic.
Some nonmetallic minerals reflect light strongly and may appear highly polished.
During hardness testing, beginners sometimes mistake transferred material for an actual scratch.
Streak tests may also produce misleading results when the mineral is harder than the porcelain plate.
Finally, crystal faces should not automatically be confused with cleavage surfaces.
A crystal may naturally grow with flat external faces, while cleavage describes how it breaks along internal planes.
Careful observation and repeated comparison help reduce these errors.
Safety Tips for Mineral Identification
Most basic mineral observations can be performed safely with simple precautions.
However, some minerals contain potentially harmful substances or may produce hazardous dust when broken or ground.
Avoid inhaling mineral powders.
Do not taste unknown minerals, even if a guide describes taste as an identifying property.
Wear suitable eye protection when working with sharp specimens or tools.
Do not intentionally break valuable or delicate samples unless necessary.
If a specimen may contain toxic elements or hazardous fibers, seek expert guidance before handling or testing it.
Non-destructive visual examination is usually the best starting point.
Frequently Asked Questions
What are the four main properties used to identify minerals?
Hardness, streak, luster, and cleavage are four important physical properties commonly used in beginner mineral identification.
What is the Mohs hardness scale?
It is a relative scale that ranks minerals from 1 to 10 based on resistance to scratching.
Why is streak more useful than color?
For many minerals, powder color is more consistent than the visible color of the intact specimen.
What is the difference between cleavage and fracture?
Cleavage occurs along preferred structural planes, while fracture describes breakage that does not follow those planes.
Can quartz scratch glass?
Yes. Quartz has a Mohs hardness of 7, making it harder than ordinary glass.
Why does pyrite look like gold?
Pyrite has a brassy-yellow color and metallic luster, but its hardness and streak differ significantly from those of native gold.
Can every mineral be identified with these four tests?
No. Some minerals require additional tests, such as density measurements, crystal analysis, chemical testing, or laboratory instruments.
Final Thoughts
Mineral identification becomes much more reliable when several physical properties are examined together.
Hardness reveals how strongly a mineral resists scratching.
Streak provides information about its powder color.
Luster describes how its surface reflects light.
Cleavage reveals patterns of weakness related to the mineral’s internal crystal structure.
By combining these observations, geologists and beginners can distinguish many common minerals and narrow down uncertain specimens.
Although some identifications require advanced testing, these four properties provide an excellent foundation for learning practical mineralogy.
Every mineral specimen contains clues about its composition and structure. Learning to recognize those clues turns an ordinary rock collection into an opportunity for scientific discovery.